Password-less Authentication — Speed up Sign-in with FaceID/TouchID

Many banking apps have introduced an experience to allow you to login with just a FaceID or TouchID. The experience works as follows:

  1. After you successfully login, the app asks you if you want to use FaceID/TouchID to speed up login in the future, like this TaxCaddy interface:

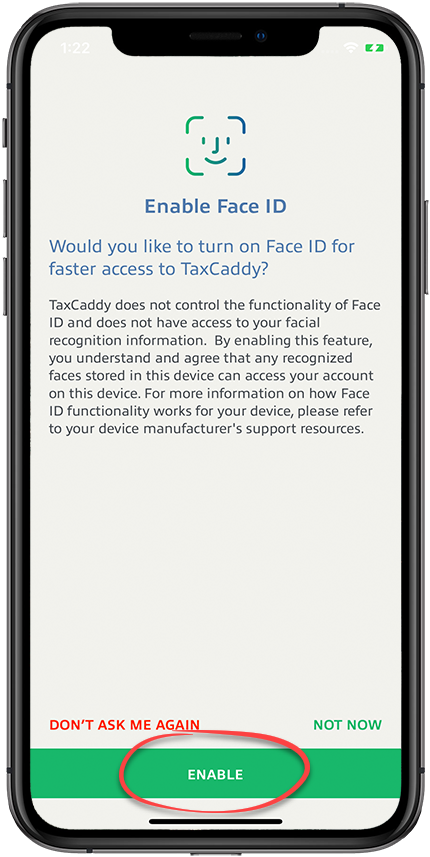
2. When you consent, a system prompt pops up to confirm FaceID/TouchID enrollment.

3. When you login in the future, a FaceID/TouchID prompt pops up automatically, and if the scan is successful, you are logged in. No more passwords, no more OTP code through SMS.

How is this implemented under the hood? Is it secure? In this post, I will show you some sample code, and explain how it works.

How it works

While the login is a password-less experience, under the hood, it is actually implemented with a password like mechanism.

In step 2 above, when you enroll in FaceID/TouchID, a secret is generated. The secret is both stored locally on your device (guarded by the FaceID/TouchID), and also stored on the server.

In step 3 above, when you scan your FaceID/TouchID, it unlocks the saved secret, then it sends the secret to the server for comparison. If the server confirms that the secret matches, you are allowed in.

Even though it is a password-less experience, and you are not directly aware of the secret, the secret serves the same purpose as a regular password.

Code sample

There are at least a couple of ways of implementing this logic in iOS. You could use the Keychain API to store the secret and attach an access policy generated by the SecAccessControlCreateWithFlags API. Since you can easily find a sample code for that, I will show a different, and yet simpler way to leverage the LARight API, by leveraging the LASecret field that is stored as part of the LAPersistedRight object.

In step 2 above, we first generate a long random secret which is hard for a human to remember. Then, use iOS’s LARight API to save the secret to the Keychain on the device locally, as follows:

// retrieve a Secret from server, and save locally
func saveSecret() async throws -> Data {
    // let server generate a random unique secret
    let secret : Data = getRandomSecretFromServer()
    // initialize LARight
    let right = LARight()
    // in case there were secret generated before, clean up before saving a new secret
    try await LARightStore.shared.removeRight(forIdentifier: keyIdentifier)
    // save a new PersistedRight with the secret
    let persistedRight = try await LARightStore.shared.saveRight(right, identifier: keyIdentifier, secret: secret)
    try await persistedRight.authorize(localizedReason: "Saving secret...")

    // return the secret in case the UI wants to display a hash
    return try await persistedRight.secret.rawData
}

In step 3, when we need to verify the secret with the server, we call the following function:

func verifySecret() -> Bool {
    // retrieve the previously saved secret from Keychain
    let persistedRight = try await LARightStore.shared.right(forIdentifier: keyIdentifier)
    try await persistedRight.authorize(localizedReason: "Authenticating...")
    let localSecret = try await persistedRight.secret.rawData

    // verify with the server
    return verifySecretWithServer(localSecret)
}

Is it secure? Should I implement FIDO2 instead?

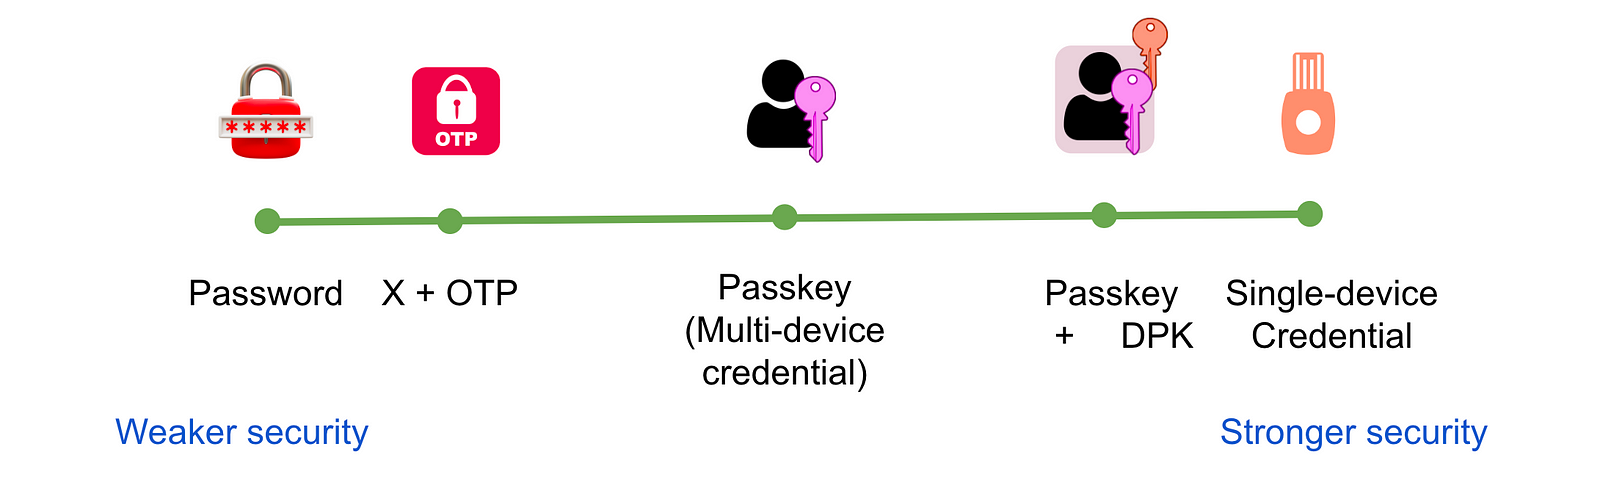
This FaceID/TouchID mechanism described above is stronger in its security guarantee than a password. It is phishing-proof because the secret is not humanly readable, thus there is nothing to leak in a social-engineering attack. It can also be considered as 2FA (Two Factor Authentication), because it verifies both something you own (your device where the secret is stored) and something you are (your face or touch scan).

However, this FaceID/TouchID mechanism is weaker than the FIDO2 protocol, because it is not server-hacking proof. The secret stored on the server could be leaked if the server is comprised. In contrast, FIDO2 is server-hacking proof, because it only stores a public key on the server, and a hacker cannot gain any advantage even if they gain access to the public key.

Summary

I have shown you some simple code on how to implement a FaceID/TouchID password-less experience. If you are not ready to adopt FIDO2 yet, this is a simple way to boost your app’s security. Compared to FIDO2, this solution offers a simpler account recovery experience. If the user loses their device, the server still has the secret, which can be used to bootstrap a new device.

Note: this article is also posted at medium as Password-less Authentication — Speed up Sign-in with FaceID/TouchID.

What to consider when adopting Passkey and how to build a great Passkey user experience

Are you considering adopting Passkey? It is not a one line code change to integrate Passkey, due to the immature platform implementation and the user education required. I gave a talk at IdentiVerse 2023 to highlight what you need to consider when you adopt Passkey. If you missed my talk, or could not attend IdentiVerse, here is the audio recording and presentation of my talk.

Huan’s presentation at IdentiVerse

Leave comments if you want to learn more. Otherwise, see you next year at IdentiVerse, which I highly recommend, as it is the #1 best conference in the Identity industry.

Note: This article is also posted on my medium site at Passkey adoption talk at IdentiVerse.

Passkey: AAL3 Strong Security with a Customizable Interface

Apple introduced Passkey a year ago in WWDC2022. It is ground breaking in that it allows the private key in a FIDO credential to be stored in the iCloud keychain, and facilitates it to be propagated from device to device. While it makes the FIDO credential easy to use, and it solves the bootstrapping problem (someone logging into a website/app from a new device), it comes with a security downside that the private key is no longer stored in the hardware TPM module. Because of this downside, according to NIST, passkey can only be classified as providing an AAL2 level assurance.

The following picture shows a security strength tradeoff among common authentication factors.

Spectrum of security guarantee

To get to the highest security level, we need to leverage a hardware device. Unfortunately, the current Passkey implementations by Apple and Google do not give developers an option to choose a TPM module. 

What if you really want a high security guarantee? You can obviously use a physical security key such as a Yubikey, but that is both costly and hard to use. This post shows you how to leverage the built-in TPM (also called Secure Enclave) using the raw primitives provided by the iOS platform to build a FIDO solution from scratch.

The concept behind FIDO is simple. It leverages private and public key cryptography, where a user uses the private key to sign a nonce from the server, and prove that it possess the private key. In this Post, we will demonstrate how you can achieve the same authentication routine with native iOS APIs. This is not an exact implementation of the complete FIDO protocol, but it focuses only on the private public key portion due to page limit. But you could expand on the example if you choose.

We will use the Local Authentication framework in iOS, which will generate a LAPublicKey LAPrivateKey pair to be stored in the TPM module. Then we will demonstrate how to sign a signature with the LAPrivateKey, and how to validate the signature with the LAPublicKey.

Credential Enrollment during Registration

First, we demonstrate how to generate a key pair during Registration. We leverage LARightStore, which stores a LAPersistedRight backed by a unique key in the Secure Enclave. We create a function generateClientKeys() to capture the full logic. First, we initiate a LARight(), which is “a grouped set of requirements that gate access to a resource or operation”. When we call LARightStore.shared.saveRight(), a key pair is generated, and the keys and the right are persisted, and a LAPersistedRight is returned. We can get a reference to the public key for the newly generated key by calling persistedRight.key.publicKey. This public key is returned so that the caller can persist the public key on the server side for future verification.

// generate a key pair
func generateClientKeys() async throws -> Data {
    let right = LARight()
    // in case there were key generated before, clean up before generate a new key pair
    try await LARightStore.shared.removeRight(forIdentifier: "fido-key")
    // generate a new key pair
    let persistedRight = try await LARightStore.shared.saveRight(right, identifier: keyIdentifier)
    return try await persistedRight.key.publicKey.bytes
}

Note that, we also call LARightStore.shared.removeRight() right before saveRight(). This is to remove any old key if one was saved under the same identifier before. 

Authentication

After registration, when a user comes back to your app again and needs to login, we need to go through the authentication ceremony to verify the user. The following code is a simplified FIDO flow. First, following the FIDO protocol, we need to call the server to retrieve a nonce. A nonce is used to prevent a replay attack. Then, we call the following function to sign the nonce. 

func signServerChallenge(nonce: Data) async throws -> Data {
    let persistedRight = try await LARightStore.shared.right(forIdentifier: "fido-key")
    try await persistedRight.authorize(localizedReason: "Authenticating...")

    // verify we can sign
    guard persistedRight.key.canSign(using: .ecdsaSignatureMessageX962SHA256) else {
        throw NSError(domain: "SampleErrorDomain", code: -1, userInfo: [:])
    }

    return try await persistedRight.key.sign(nonce, algorithm: .ecdsaSignatureMessageX962SHA256)
}

This function first look up the LAPersistedRight under the same identifier. If found, it asks the user for authorization to use the key, then it uses the private key to sign the nonce. The nonce and its signature should be sent to the server for verification. 

Sample code and demo

The FIDO in TPM project is a demo project incorporating the code snippet above to demonstrate the user interface for both the registration and authentication ceremonies. You can also watch this video demo to see the registration and authentication user experience. 

When to use this solution

Why would not you use the native WebAuthn APIs provided by the platform (Authentication Services API on iOS or the Credential Manager API on Android)? There are several reasons to use a home grown solution as outlined in this post:

Strong security (up to AAL3 level)

This solution would allow you to provide a strong security assurance using the built-in platform authenticators (TouchID or FaceID) without the need to buy a separate security key (such as a Yubikey). It is both secure and easy to use, because you do not have to carry an extra piece of hardware. 

More customizable UX and UI

As shown in the demo video, the registration experience is much simplified, where it could even be done silently without a user interaction. The authentication experience is also simpler, with a lot of room to customize the experience. In particular, you could choose to mention “Biometric” or some other more familiar terminology to the end user, since most users have not heard of passkey. This gives you the flexibility if you do not want to market the feature as passkey. 

Not required to be tied to a website.

WebAuthn is a web API following the FIDO standard. To avoid phishing attacks, WebAuthn requires the credential to be bounded to a web domain. When iOS and Android introduced the equivalent native API, they followed this design by requiring your app to be bounded to a web domain through a universal link. But your app may not have a web presence. This solution saves you the hassle of setting up a website and configuring for universal links.

Conclusion

Unlike inside a web browser when you are limited to the WebAuthn API, you have a full range of APIs to leverage in a native app. If you do not want to use the FIDO API given by the platform, you actually can implement the FIDO protocol yourself. Hopefully, this post shows you the basis if you want to venture into more customizations and a stronger security assurance. 

Note: this article is also posted at Passkey: AAL3 Strong Security with a Customizable Interface

Passkey vs. Password

You heard of passkey from somewhere, or you start to see some websites or mobile apps using passkey, but you have no idea what it is. You are not alone! In a recent user research we conducted on our user base, we found that a very small number of people have heard of it, and an even smaller portion actually understands it.  That is why early adopters go out of their way to explain what is a passkey. For example, the following is a screenshot of the Shopify app, where they dedicate a whole page to educate the users.

If you want a more thorough understanding of passkey beyond that single page, read on. 

What is Passkey 

It is best to understand passkey and how it is different from password, through the lens of an analogy. 

Let us start with passwords. Password is a shared secret where both you and the server know about. If you can present the secret to the server, and the server can match it up with what it knows, you are in. This is similar to “Open Sesame” in Aladdin, where you open the cave by shouting out the secret.

“Open Sesame” in Aladdin

Password is easy to use, but it carries a well-known downside — it can be easily eavesdropped. 

Passkey fundamentally works differently. It consists of two keys, one is called a private Key, which is stored on your local device, and another is called a public Key, which is stored on the server. Passkey works as follows:

  • Server sends a unique message to your local device
  • Your device uses the private key to sign the message
  • The server, who already has the corresponding public key, can testify the message is signed by your private key. If testified, you are in. 

This is analogous of how your bank verifies your signature on a check before letting you withdraw money in the physical world.

The analogy is not 100% matching. In the physical world, it is feasible to forge a signature to fool the bank teller. But, in passkey, there is no way to forge a signature, because it is based on the proven private/public key cryptography. Only the person with the private key can produce a signature that can be verified by the public key. 

Why adopt now

If password works perfectly, why try something else? For passkey, there are at least two good reasons to give it a try as soon as possible. 

1. Higher security

Working in a financial services company, I frequently see ATOs (Account Take Overs). Password is easy to fool through social engineering through a technique called phishing. For example, attackers can pretend to be a customer service agent, they will pretend to help you solve an issue, and trick you to give out your password. Passkey is strong because it is phishing-proof. There is no secret that you can be tricked to give out.

2. Easy to use

Passkey is an unique technology where it is both secure and easy-to-use at the same time, so there is not a tradeoff where you have to give up on usability. If implemented correctly, you can skip password and second factor authentication (e.g., a SMS code) altogether with one passkey verification. Passkey verification is also super simple. You can either do a biometric scan or use your phone’s passcode. 

Manage your passkeys

Now that you have started to use passkey in some apps, it is important to know how passkey differs from password, so that you can manage your passkeys differently. Passkey differs from password in a couple of areas:,

1. One vs. Two

In passkey, it is important to note that there are 2 keys, one private and one public. The private key is stored on your client device, and the public key is stored on the server. If you want to remove a passkey, keep in mind which key you are touching. 

  • If you want to remove a passkey from accessing a website or app, remove the public key stored on the server. No matter where the corresponding private key is stored, it is no longer useable for login, because the server can no longer validate its signature. 

    (An app’s interface to help you manage the public key on the server)
  • If you just want to remove passkey from one device from accessing a website or app, remove the private key on your device. If the private key is replicated on multiple devices, you can still login to the website/app through other devices. 

    (The iOS interface to manage the private key in your phone’s Settings app)
  • If you are a clean freak, remove both keys on the client and server. But keep in mind that it is not necessary, removing one is sufficient to remove access. 

2. One vs. Many

Unlike password, where you only have one password active at any given time, there may be multiple passkeys due to the fragmentation in platform unification (see the technical details in an earlier post). It is important to remember that you may have a separate passkey per platform, or even a separate passkey per device. When you create passkeys, try to give them a different name to differentiate them, if it is offered by the website and app. 

Conclusion 

Passkey is the new kid on the block, but it has a huge potential to solve all problems associated with passwords. I hope this post gives you a good introduction to understand how it is different. Leave a comment if you are still confused, I would be happy to share more insights.

(This article is also posted at Medium Passkey vs. Password)

Passkey Limitations and Adoption Considerations

Apple announced Passkey in WWDC’22 a couple of months ago. Both Microsoft and Google quickly followed suit, announcing their support in the RSA and IdentiVerse conferences. Passkey is promising to potentially replace passwords eventually, but the road to that promise may be long and bumpy. There are at least 3 issues that will prevent a widespread adoption in the short term, which I will elaborate in this post. If you want to adopt Passkey in your app, read on to understand the implications and think through how to overcome those limitations. 

Background

Before I describe its limitations, let us understand what is Passkey first. Passkey builds on FIDO2 set of specifications. FIDO2 specifies a new way to register and sign in to an app or a website, which is also referred to as a RP (Relying Party) in the spec. When a user registers with a RP, a private/public key pair is generated (e.g., by a browser). The private key is stored on the client and it is kept private, and the public key is stored at the RP. When the user subsequently logs in, the RP sends a unique nonce for the client to sign with its private key. When the RP is able to verify that the nonce is signed with the private key corresponding to its public key, the RP is certain that the client is the same user as the one during the registration. This process is illustrated in the figure below. 

How Passkey works

In the current FIDO2 implementation, the private key is typically stored on a hardware module, such as a TPM (Trusted Platform Module), on the user’s device. The private key can be used to sign a nonce, but it can never be exported, so it is secure. 

Passkey extends FIDO2 in two ways. 

  1. Passkey allows the private key to be synced across devices, e.g., through the iCloud keychain. This is actually not part of the FIDO2 spec. FIDO2 does not prescribe how the key should be stored on the client side, however, Passkey makes it explicit that the key may be synced outside of a device. Passkey is a vendor implementation term, and in the FIDO community, it is officially called multi-device credential
  2. Passkey introduces a new protocol to allow a phone to be used as a roaming authenticator. This is the demo Apple showed in WWDC, where the website pops up a QR code, and users use their phones to scan and authenticate. The private key is stored on the phone, and a communication protocol allows the signed nonce to be transmitted from the phone to the app to authenticate the user.

There are a lot of advantages of FIDO2, which are highlighted in the Apple presentation, including:

  • No shared secret like password, so nothing to steal from the server side.
  • Not phishable. Phishing is the #1 vulnerability today. The FIDO2 protocol makes sure that it only signs a nonce corresponding to the right RP. No more tricking people into believing when you visit a fake website.  

Because of these inherent advantages, Passkey will eventually replace password, but there are several challenges along the way. 

Challenge 1: Lower security level

The first challenge for adoption is that Passkey lowers the security promise. Before Passkey, the FIDO2 private key was typically stored on a hardware TPM module if available, which has the nice property that guarantees the key could not be exported. To understand the impact, it is helpful to understand how NIST (National Institute of Standards and Technology) thinks about security levels. NIST defines three Authenticator Assurance Level (AAL):

  • AAL1: You just need to prove you control one authenticator that is bound to the account. The single authenticator could just be a password. 
  • AAL2: Proof of possession and control of two distinct authentication factors are required. This is also often referred to as the Multi-Factor Authentication (MFA). An example is SMS verification in addition to password. 
  • AAL3: It is based on proof of possession of a key through a cryptographic protocol. AAL3 authentication SHALL use a hardware-based authenticator and an authenticator that provides verifier impersonation resistance. In order to authenticate at AAL3, claimants SHALL prove possession and control of two distinct authentication factors through secure authentication protocol(s). A key requirement of AAL3 is that the private key cannot be exported, so that, by proving that you own the private key, you also prove that you possess the hardware device. 
Assurance level trade off between various credentials, from the least secure (left), to the most secure (right)

The figure above (courtesy of Shane’s RSA presentation) illustrates the security tradeoffs between various sign in methods, from the least secure to the left, to the most secure on the right. Prior to Passkey, the default is “Device-bound FIDO credential” when FIDO authentication is used, which is the most secure. By introducing Passkey, we move to “multi-device passkey”. 

The use of Passkey is a platform decision. There is not an option for either the RP or the user to disable Passkey, i.e., it is not possible to choose “device-bound FIDO credential” anymore. 

FIDO alliance is working on a new device-bound-key extension, which allows an RP to request an additional key that is both unique and bounded to the device. If a device-bound-key exists, RP can verify if the device is a known device. Or, if a device-bound-key does not exist, RP will know the authentication is happening in a new device, and it can step up authentication if needed. Device-bound-key provides AAL3 security assurance, but unfortunately, it is an optional extension that may not get widespread adoption by vendors. 

Challenge 2: Sync across ecosystems

Passkey relies on client side synchronization to distribute the keys to users’ devices. The synchronization mechanism is vendor specific. There are three potential layers at which the keys could be synchronized. 

  1. Platform level: This is a capability provided by the OS vendor that is built-in to the OS. An example is the iCloud keychain. The OS vendors manage the users’ identity and their devices, and they propagate the private key across devices the users own. 
  2. Browser level: Browsers also provide an ability for users to login an account, and synchronize their data. For example, in Chrome, you can login to your Google account, and sync data across all browser instances, potentially on multiple devices across OS ecosystems (e.g., between iOS, Windows, Mac and Android). 
  3. App level: A password manager app is used widely to synchronize passwords at the application level, and a similar or same app could do the same thing for passkeys. They may have to use a browser plugin to hook into the sign-in/registration process. To synchronize passkeys, a passkey manager app needs an interface to interact with the authenticators to access the keys. 

The current passkey implementation will sync keys at the platform level, although there might be an option to expose an OS interface to allow app level syncing in the future. 

The current direction of platform level key syncing presents challenges.

  1. First, the platform may not have visibility to all keys in all browsers. MacOS behaves differently than other platforms, such as iOS, Android and Windows. On MacOS, different browsers see a different subset of the platform authenticator, e.g., the TouchID authenticator. When chrome creates a FIDO key, the key is not visible to other browsers, such as Safai and Firefox, or vice versa. Apple platform will only sync keys created by Safari, and because of the key isolation, keys created by other browsers such as Chrome and Safari will not be synced beyond the MacOS device.


    This behavior will be confusing to an end user. Users may create a FIDO2 key in Chrome on MacOS, and assume that the key will be sync’ed by iCloud keychain, as implied by Apple’s passkey annoucement. But, in reality, they will be suprised when the keys are not available on their iOS devices.

    While there is a plan to change this behavior, it will likely take some time, since it requires both OS and browsers to change. 
  2. Second, cross platform experience is confusing to the end users. There are several scenarios:
  • If you are largely in the Apple ecosystem, the experience is ok (except the multi-browser scenario on MacOS as described above). The keys in your iPhone, iPad and Mac all sync through iCloud Keychain. The only challenge is when you decide to switch platform (e.g., to Windows). There is no mechanism to export keys in bulk, so your keys are stuck in the iCloud. 
  • If you use Windows, your experience is much worse. Because Microsoft does not own a mobile platform, your keys are likely spread over multiple platforms, e.g, Windows and Android. The keys you register on your Windows machine are isolated from the keys you register on Android or iOS when you are on the mobile platforms. You have to constantly remember where your keys are stored on what platform when you login to a RP. One possible solution is to make sure all your keys are stored on your mobile platform. Since mobile platforms support QR code scanning, they not only can be used to log you into an RP from your phone, but they can also log you into an RP on Windows. Unfortunately, the QR scanning experience is cumbersome, which involves extra clicks to bring up the QR code, and hunting for the mobile phone to scan and complete the login. 

Microsoft and Google could have built a much better user experience had they chosen to sync the keys at the browser level. Neither of them own both the desktop and mobile platforms, so their users would have to live with the cross-platform clunkiness if they own both desktop and mobile devices. 

Challenge 3: Explicitly manage multiple private/public keys 

With passwords, there is only 1 shared secret to store on the server side. Disabling login is as simple as removing the shared secret on the server. With passkeys, there are multiple private/public key pairs, with at least one pair for each platform. Disabling login requires the user to understand which key is used on each platform, and to make sure deleting the correct key. Removing the wrong public key would mean the user can no longer login on the corresponding platform. 

The user also must be conscious that there are a pair of keys for each credential. Removing the public key on the RP is sufficient to revoke access, but the private key may still be visible on the client side, which may be confusing to the user. 

The transition to passkey is happening. Apple’s implementation will be out shortly, Android’s and Windows’ implementation will quickly follow. If you support WebAuthn/FIDO2 on your RP already, or if you plan to adopt passkey-based login directly, consider these recommendations.

Adoption considerations

  1. Add recovery options. While Apple makes it sounds like passkey is all you need in their announcements, there are many scenarios where you cannot rely on passkey being there. Not only that users may switch platform, but even if a user stays in the Apple ecosystem, they may be using Chrome on their Mac, which would require a separate set of keys from their iCloud passkeys. To make sure a user can still login, you should add other options to allow a user to login, possibly as a recovery mechanism. Potential mechanisms can be Magic Link, or OTP code over SMS, or security questions. When a user uses a recovery mechanism to login on a new platform/device/browser, you can then generate new keypairs to allow users to login with passkeys on the same device in the future.
  2. Detect and enhance security assurance as needed. If your app requires AAL3 level assurance, you can no longer assume the FIDO2 keys are device bound. You have to introduce additional logic to ensure high assurance level, which could be as follows:
    • First, you should detect if Passkey is used. WebAuthn (the Javascript API for FIDO2) enhanced the protocol to offer two additional bits of information: credential backup eligibility (BE) and current backup state (BS) in the authenticator data. BE is set to true when Passkey is used. 
    • Second, detect if device-bound-key extension is supported. device-bound-key is an optional enhancement to FIDO2. It is still under definition, and not all browsers will implement it. But if the browser supports it, you can request device-bound-key to ensure AAL3 security level. 
    • Third, if device-bound-key extension is not available, you have to implement your own device detection, and step up authentication if a new devie is found. For example, you can use a browser cookie to remember if the user has logged in from the browser before, and add step up authentication logic if a new device is used.
  3. Record User Agent. The user could have multiple keys from multiple platforms/browsers, and it becomes confusing to the end user on how to manage the keys. Remembering the user agent during enrollment could help the user distinguish between the different keys. Optionally, during enrollment, you could also ask the user for a unique name to identify the key, and store the unique name along with the key. Additional user education may also be required as they transition from paswords to passkeys.

Conclusion

We are at the early stage of passkey adoption, a lot of user experience quarks need to be worked out, and more user education is needed. The blog highlights some challenges that we need to consider, hopefully it helps you think through solutions to help your users transition successfully.

Note: this article is also posted at Passkey Limitations and Adoption Considerations

Amazon EC2 grows 62% in 2 years

I estimated Amazon data center size about two years ago using a unique probing technique that I came up with. Since then, I have been tracking their growth (US East data center monthly, but less frequently for all data centers). Now is the time to give you all an update.

Physical server

I will not cover the technique again here, since you can refer to the original post. But I want to stress that this is measuring the number of physical server racks in their data centers, hence deducing the number of physical servers. There are other approaches, such as Netcraft that measures the web facing virtual servers. However, Netcraft only measures the number of virtual servers (and only a subset of it, those that are web facing), where a virtual server could be a tiny Micro instance, a very small slice of a physical server. If you want to know how big EC2 is physically, this is the definitive research.

The following figure shows the growth of the US East data center.

useastgrowthtrend

Number of server racks in EC2 US East data center

The growth in US East data center slowed down in late 2012 and 2013, but the growth has picked up quite a bit recently. It only added 1,362 racks between Mar. 12, 2012 and Dec. 29th, 2013, whereas, it has been adding on average 1,000 racks per year between 2007 and 2013. Then, all of a sudden, it adds 431 racks in the last month and half. However, other EC2 data centers have enjoyed tremendous growth in the two years period. The following table shows how many racks I can observe today, and at the end of last year vs. two years ago by each data center.

data center # of server racks on 3/12/2012 # of server racks on 12/29/2013 % growth 3/12/2012 to 12/29/2013 # of server racks on 2/18/2014 % growth 3/12/2012 to 2/18/2014
US East (Virginia) 5,030 6,382 26.9% 6,813 35.4%
US West (Oregon) 41 619 1410% 904 2205%
US West (N. California) 630 847 34.4% 950 50.8%
EU West (Ireland) 814 1,340 64.6% 1,556 191.2%
AP Northeast (Japan) 314 589 87.6% 719 229%
AP Southeast (Singapore) 246 371 50.8% 432 75.6%
SA East (Sao Paulo) 25 83 232% 122 488%
Total 7,100 10,231 44.1% 11,496 61.9%

There are a few observations:

1. The overall growth rate shows no sign of slowing down. From Jan. 2007 to Mar. 2012, EC2 grows from almost 0 server to 7,100 racks of servers, roughly 1,420 racks per year. From Mar. 2012 to Feb. 2014, EC2 grows from 7,100 racks to 11,496 racks, which is 2,198 racks per year.

2. Most of the growth is not from the US East data center. The Oregon data center grows the most at 2205%, followed by Sao Paulo at 488%.

3. There is a huge spike within the last 1.5 months. The number of racks increased from 10,231 to 11,496, adding 1,265 racks of servers.

The overall growth in the last two years is 62%, which is quite impressive. However, others have estimated that AWS revenue have been growing at a faster rate of more than 50% per year. The discrepancy could be due to the fact that AWS revenue includes many other AWS services including some new ones they have introduced in recent years, and EC2 is just a smaller component of it.

Virtual server growth

Another way to look at EC2’s growth is to look at how many virtual servers are running. Since a customer is paying for a virtual server, looking at the virtual server trend is also a good predictor of EC2 revenue.

As part of our probing technique, we enumerate all virtual servers, regardless whether it hosts a web server or not. If a virtual server is running, the EC2 DNS server will have an entry translating its external IP address to its internal IP address. By counting the number of DNS entries, we arrive at an upper bound of the number of virtual servers running (it is an upper bound because when a virtual server is terminated, the DNS entry is not deleted right away).

The following figure shows the number of running virtual servers (active DNS entries) in the US East Data center in orange. AWS also publishes the number of IP addresses that are available periodically, and we have been tracking that over time. The blue points shows how many IP addresses that are available to assign to virtual servers. AWS has been constantly adding more IP address allocation ahead of the expected growth.

AWS number of running virtual servers

EC2 number of running virtual servers

The green dots show the total available IP addresses across all data center. It is an upper bound on the maximum number of virtual servers EC2 can run. On Dec. 29th, 2013, our data shows there are up to 2.97 Million virtual machines that are active. You can put in an assumption of the average price AWS charges for an instance to roughly estimate EC2 revenue.

Density

From our data, we can also derive the density — the average number of virtual servers running on a physical server. On Mar. 12, 2012, there are 120 virtual servers running on each server rack. However, on Dec. 29th, 2013, this density has increased to 245 virtual servers per rack. Either the Micro instance is gaining popularity, or AWS has been doing a better job of consolidating their load to increase the profit margin.

Parting comment

I have not been blogging much in the last two years. You may be wondering what I have been doing. Well, I have been working on a startup, today we finally come out of stealth mode, and we are officially launching at the Launch Festival. It is an iPhone app, called Jamo, that brings dance games from Wii and Xbox to the iPhone. If this research has been helpful to you, please help me by downloading the App, and give us a 5* rating. You can read more about the App in a previous post.

Amazon DynamoDB use cases

In-memory computing is clearly hot. It is reported that SAP HANA has been “one of SAP’s more successful new products — and perhaps the fastest growing new product the company ever launched”. Similarly, I have heard Amazon DynamoDB is also a rapidly growing product for AWS. Part of the reason is that the price for in-memory technology has dropped significantly, both for SSD flash memory and traditional RAM, as shown in the following graph (excerp from Hasso Plattner and Alexander Zeier’s book, page 15).

In-memory technology offers both higher throughput and lower latency, thus it could potentially be used to satisfy a range of latency-hungry or bandwidth-hungry applications. To understand DynamoDB’s sweet spots, we looked into many areas where DynamoDB could be used, and we concluded that DynamoDB does not make sense for applications that desire a higher throughput, but it does make sense for a portion of the applications that desire a lower latency. This post is about our reasoning when investigating DynamoDB, hope it helps those of you who are considering adopting the technology.

Let us start examining a couple of broader classes of applications, and see which one might be a good fit for DynamoDB.

Batch applications

Batch applications are those with a large volume of data that needs to be analyzed. Typically, there is a less stringent latency requirement. Many batch applications can run overnight or for even longer before the report is needed. However, there is a strong requirement for high throughput due to the volume of data. Hadoop, a framework for batch applications, is a good example. It cannot guarantee low latency, but it can sustain a high throughput through horizontal scaling.

For data intensive applications, such as those targeted by the Hadoop platform, it is easy to scale the bandwidth. Because there is an embarassing amount of parallelism, you can simply add more servers to the cluster to scale out the throughput. Given that it is feasible to get high bandwidth both through in-memory technology and through disk-based technology using horizontal scaling, it comes down to price comparison.

The RAMCloud project has made an argument that in-memory technology is actually cheaper in certain cases. As noted by the RAMCloud paper, even though hard drive’s price has also fallen over the years, the IO bandwidth of a hard disk has not improved much. If you desire to access each data item more frequently, you simply cannot fill up the disk; otherwise, you will choke the disk IO interface. For example, the RAMCloud paper calculates that you can access any data only 6 times a year on average if you fill up a modern disk (assuming random access for 1k blocks). Since you can only use a small portion of a hard disk if you need high IO throughput, your effective cost per bit goes up. At some point, it is more expensive than an in-memory solution. The following figure from the RAMCloud paper shows in which area a particular technology becomes the cheapest solution. As the graph shows, when the data set is relatively smaller, and when the IO requirement is high, in-memory technology is the winner.

The key to RAMCloud’s argument is that you cannot fill up a disk, thus the effective cost is higher. However, this argument does not apply in the cloud. You pay AWS for the actual storage space you use, and you do not care a large portion of the disk is empty. In effect, you count on getting a higher access rate to your data at the expense of other people’s data getting a lower access rate (This is certainly true for some of my data in S3 which I have not accessed even once since I started using AWS in 2006). In our own tests, we get a very high throughput rate from both S3 and SimpleDB (by spreading the data over many domains). Although there is no guarantee on access rate, S3 comes at a cost of 1/8 and SimpleDB comes at a cost of 1/4 of that of DynamoDB, making both an attractive alternative for batch applications.

In summary, if you are deploying in house where you are paying for the infrastructure cost, it may make sense economically to use in-memory technology for your batch applications. However, in a hosted cloud environment where you only pay for the actual storage you use, in-memory technology, such as DynamoDB, is less likely a candidate for batch applications.

Web applications

We have argued that bandwidth-hungry applications are not a good fit for DynamoDB because there is a cheaper way using a disk based solution by leveraging shared bandwidth in the cloud. But let us look at another type of applicaton — web appplications — which may value the lower latency offered by DynamoDB.

Interactive web applications

First, let us consider an interactive web application, where users may create data on your website, then they may query the data in many different forms. Our work around Gamification typically involves this kind of application. For example, in Steptacular (our previous Gamification work on health care/wellness), users need to upload their walking history, then they may need to query their history in many different format and look at their friends’ actions.

For our current Gamification project, we seriously considered using DynamoDB, but in the end, we concluded that it is not a good fit for two reasons.

1. Immaturity of ORM tools

Many web applications are developed using an ORM (Object Relational Mapping) tool. This is because an ORM tool shields you away from the complexity of the underlying data store, allowing the developers to be more productive. Ruby’s ActiveRecords is the best I have seen, where you just define your data model in one place. Unlike earlier ORM tools, such as Hibernate for Java, you do not even have to explicitly define a mapping using an XML file, all the mapping is done automatically.

Even though Amazon SDK comes with an ORM layer, its feature set is far from other mature ORM tools. People are developing a more complete ORM tool, but the lack of features from DynamoDB (e.g., no auto-increment ID field support) and the wide grounds to cover for each progamming language means that it could be a while before this field matures.

2. Lack of secondary index

The lack of secondary index support makes it a no go for a majority of interactive web applications. These interactive web applications need to present data in many different dimensions, each dimension needs to have an index for an efficient query.

AWS recommends that you duplicate data in different tables, so that you can use the primary index to query efficiently. Unfortunately, this is not really practical. This requires multiple writes on data input, which is not only a performance killer, but it also creates a coherence management nightware. The coherence management problem is difficult to get around. Consider a failure scenario, where you successfully wrote the first copy, but then you failed when you are updating the data in the second table with a different index structure. What do you do in that case? You cannot simply roll back the last update because, like many other NoSQL data stores, DynamoDB does not support transaction. So you will end up with an inconsistent state.

Hybrid web/batch applications

Next, let us consider a different type of web application, which I refer to as the google-search-type web application. This type of application has little or no data input from the web front end, or if it takes data from the web front end, the data is not going to be queried over more than one dimension. In other words, this type of application is mostly read-only. The data it queries may come from a different source, such as from web crawling, and there is a batch process which load the data possibly into many tables with different indexes. The consistency problem is not an issue here because the batch process can simply retry without worrying about data getting out of sync since there are no other concurrent writes. The beauty of this type of application is that it can easily get around the feature limitations of DynamoDB and yet benefit from the much reduced latency to improve interactivity.

Many applications fall into this category, including BI (Business Intelligence) applications and many visualization applications. Part of the reason that SAP HANA is taking off is because the demands from BI applications for faster, interactive queries. I think the same demand is probably driving the demand for DynamoDB.

What type of applications are you deploying in DynamoDB? If you are deploying an interactive web application or a batch application, I would really like to hear from you to understand the rationale.

Amazon data center size

(Edit 3/16/2012: I am surprised that this post is picked up by a lot of media outlets. Given the strong interest, I want to emphasize what is measured and what is derived. The # of server racks in EC2 is what I am directly observing. By assuming 64 physical servers in a rack, I can derive the rough server count. But remember this is an *assumption*. Check the comments below that some think that AWS uses 1U server, others think that AWS is less dense. Obviously, using a different assumption, the estimated server number would be different. For example, if a credible source tells you that AWS uses 36 1U servers in each rack, the number of servers would be 255,600. An additional note: please visit my disclaimer page. This is a personal blog, only represents my personal opinion, not my employer’s.)

Similar to the EC2 CPU utilization rate, another piece of secret information Amazon will never share with you is the size of their data center. But it is really informative if we can get a glimpse, because Amazon is clearly a leader in this space, and their growth rate would be a great indicator of how well the cloud industry is doing.

Although Amazon would never tell you, I have figured out a way to probe for its size. There have been early guesstimates on how big Amazon cloud is, and there are even tricks to figure out how many virtual machines are started in EC2, but this is the first time anyone can estimate the real size of Amazon EC2.

The methodology is fully documented below for those inquisitive minds. If you are one of them, read it through and feel free to point out if there are any flaws in the methodology. But for those of you who just want to know the numbers: Amazon has a pretty impressive infrastructure. The following table shows the number of server racks and physical servers each of Amazon’s data centers has, as of Mar. 12, 2012. The column on server racks is what I directly probed (see the methodology below), and the column on number of servers is derived by assuming there are 64 blade servers in each rack.

data center\size # of server racks # of blade servers
US East (Virginia) 5,030 321,920
US West (Oregon) 41 2,624
US West (N. California) 630 40,320
EU West (Ireland) 814 52,096
AP Northeast (Japan) 314 20,096
AP Southeast (Singapore) 246 15,744
SA East (Sao Paulo) 25 1,600
Total 7,100 454,400

The first key observation is that Amazon now has close to half a million servers, which is quite impressive. The other observation is that the US east data center, being the first data center, is much bigger. What it means is that it is hard to compete with Amazon on scale in the US, but in other regions, the entry barrier is lower. For example, Sao Paulo has only 25 racks of servers.

I also show the growth rate of Amazon’s infrastructure for the past 6 months below. I only collected data for the US east data center because it is the largest, and the most popular data center. The Y axis shows the number of server racks in the US east data center.

EC2 US east data center growth in the number of server racks

Besides their size, the growth rate is also pretty impressive. The US east data center has been adding roughly 110 racks of servers each month. The growth rate looks roughly linear, although recently it is showing signs of slowing down.

Probing methodology

Figuring out EC2′ size is not trivial. Part of the reason is that EC2 provides you with virtual machines and it is difficult to know how many virtual machines are active on a physical host. Thus, even if we can determine how many virtual machines are there, we still cannot figure out the number of physical servers. Instead of focusing on how many servers are there, our methodology probes for the number of server racks out there.

It may sound harder to probe for the number of server racks. Luckily, EC2 uses a regular pattern of IP address assignment, which can be exploited to correlate with server racks. I noticed the pattern by looking at a lot of instances I launched over time and running traceroutes between my instances.  The pattern is as follows:

  • Each EC2 instance is assigned an internal IP address in the form of 10.x.x.x.
  • Each server rack is assigned a 10.x.x.x/22 IP address range, i.e., all virtual machines running on that server rack will have the same 22 bits IP prefix.
  • A 10.x.x.x/22 IP address range has 1024 IP addresses, but the first 256 are reserved for DOM0 virtual machines (system management virtual machine in XEN), and only the last 768 are used for customers’ instances.
  • Within the first 256 addresses, two at address 10.x.x.2 and 10.x.x.3 are reserved for routers on the rack. These two routers are arranged in a load balanced and fault-tolerant configuration to route traffic in and out of the rack. I verified that the uplink capacity from 10.x.x.2 and 10.x.x.3 are roughly 2 Gbps total, further suggesting that they are routers each with a 1Gbps uplink.

Understanding the pattern allows us to deduce how many racks are there. In particular, if we know a virtual machine at a certain internal IP address (e.g., 10.2.13.243), then we know there is a rack using the /22 address range (e.g., a rack at 10.2.12.x/22). If we take this to the extreme where we know the IP address of at least one virtual machine on each rack, then we can see all racks in EC2.

So how can we know the IP addresses of a large number of virtual machines? You can certainly launch a large number of virtual machines and record the internal IP addresses that you get, but that is going to be costly. If you are RightScale, where a large number of instances are launched through your service, you may not be able to take this approach. Another approach is to scan the whole IP address space and watch when an instance responds back to a ping. There are several problems with this approach. First, it may be considered port scanning, which is a violation of AWS’s policy. Second, not all live instances respond to ping, especially with AWS’ security group blocking all ports by default. Lastly, the whole IP address space in 10.x.x.x is huge, which would take a considerable amount of time to scan.

While you may be discouraged at this point, it turns out there is another way. In addition to the internal IP address we talked about, each AWS instance also has an external IP address. Although we cannot scan the external IP addresses either (so as not to violate the port scanning policy), we can leverage DNS translation to figure out the internal IP addresses. If you query DNS for an EC2 instance’s public DNS name from inside EC2, the DNS server will return its internal IP address (if you query it from outside of EC2, you will get the external IP instead). So, all we are left to do is to get a large number of EC2 instances’ public DNS names. Luckily, we can easily derive the list of public DNS names, because EC2 instances’ public DNS names are directly tied to their external IP addresses. An instance at external IP address x.y.z.w (e.g., 50.17.204.150) will have a public DNS name ec2-x-y-z-w…..amazonaws.com (e.g., ec2-50-17-204-150.compute-1.amazonaws.com if in US east data center). To enumerate all public DNS names, we just have to find out all public IP addresses. Again, this is easy to do because EC2 publishs all public IP addresses they use here.

Once we determined the number of server racks, we just multiply it by the number of physical servers on the rack. Unfortunately, we do not know how many physical servers are on each rack, so we have to make assumptions. I assume Amazon has dense racks, each rack has 4 10U chassis, and each chassis holds 16 blades for a total of 64 blades/rack.

Let us recap how we can find all server racks.

  • Enumerate all public IP addresses EC2 uses
  • Translate a public IP address to its public DNS name (e.g., ec2-50-17-204-150.compute-1.amazonaws.com)
  • Run a DNS query inside EC2 to get its internal IP address (e.g., 10.2.13.243).
  • Derive the rack’s IP range from the internal IP address (e.g., 10.2.12.x/22).
  • Count how many unique racks we have seen, then multiple it by the number of physical servers in a rack (I assume it is 64 servers/rack).

Caveat

Even though my methodology could provide insights that are never possible before, it has its shortcomings, which could lead to inaccurate results. The limitations are:

  • The methodology requires an active instance on a rack for the rack to be observed. If the rack has no instances running on it, we cannot count it.
  • We cannot know how many physical servers are in a rack. I assume Amazon has dense racks, each rack has 4 10U chassis, and each chassis holds 16 blades.
  • My methodology cannot tell whether the racks I observe are for EC2 only. It could be possible that other AWS services (such as S3, SQS, SimpleDB) run on virtual servers on the same set of racks. It it also possible that they run on dedicated racks, in which case, AWS is bigger than what I can observe. So, what I am observing is only a lower bound on the size of AWS.

Host server CPU utilization in Amazon EC2 cloud

One potential benefit of using a public cloud, such as Amazon EC2, is that a cloud could be more efficient. In theory, a cloud can support many users, and it can potentially achieve a much higher server utilization through aggregating a large number of demands. But is it really the case in practice?  If you ask a cloud provider, they most likely would not tell you their CPU utilization. But this is a really good information to know. Besides settling the argument whether cloud is more efficient, it is very interesting from a research angle because it points out how much room we have in terms of improving server utilization.

To answer this question, we came up with a new technique that allows us to measure the CPU utilization in public clouds, such as Amazon EC2. The idea is that if a CPU is highly utilized, the CPU chip will get hot over time, and when the CPU is idle, it will be put into sleep mode more often, and thus, the chip will cool off over time. Obviously, we cannot just stick a thermometer into a cloud server, but luckily, most modern Intel and AMD CPUs are all equipped with an on-board thermal sensor already. Generally, there is one thermal sensor for each core (e.g., 4 sensors for a quad-core CPU) which can give us a pretty good picture of the chip temperature. In a couple of cloud providers, include Amazon EC2, we are able to successfully read these temperature sensors. To monitor CPU utilization, we launch a number of small probing virtual machines (also called instances in Amazon’s terminology), and we continuously monitor the temperature changes. Because of multi-tenancy, other virtual machines will be running on the same physical host. When those virtual machines use CPU, we will be able to observe temperature changes. Essentially, the probing virtual machine is monitoring all other virtual machines sitting on the same physical host. Of course, deducing CPU utilization from CPU temperature is non-trivial, but I won’t bore you with the technical details here. Instead, I refer interested readers to the research paper.

We have carried out the measurement methodology in Amazon EC2 using 30 probing instances (each runs on a separate physical host) for a whole week. Overall, the average CPU utilization is not as high as many have imagined. Among the servers we measured, the average CPU utilization in EC2 over the whole week is 7.3%. This is certainly lower than what an internal data center could achieve. In one of the virtualized internal data center we looked at, the average utilization is 26%, more than 3 times higher than what we observe in EC2.

Why is CPU utilization not higher? I believe it results from a key limitation of EC2, that is, EC2 caps the CPU allocation for any instance. Even if the underlying host has spare CPU capacity, EC2 would not allocate additional cycles to your instance. This is rational and necessary, because, as a public cloud provider, you must guarantee as much isolation as possible in a public infrastructure so that one greedy user could not make another nice user’s life miserable. However, the downsize of this limitation is that it is very difficult to increase the physical host’s CPU utilization. In order for the utilization to be high, all instances running on the same physical host have to use the CPU at the same time. This is often not possible. We have the first-hand experience of running a production web application in Amazon. We know we need the capacity at peak time, so we provisioned an m1.xlarge server. But we also know that we cannot use the allocated CPU 100% of the time. Unfortunately, we have no way of giving up the extra CPU so that other instances can use it. As a result, I am sure the underlying physical host is very underutilized.

One may argue that the instance’s owner should turn off the instance when s/he is not using it to free up resources, but in reality, because an instance is so cheap, people never turn it off. The following figure shows a physical host that we measured. The physical host gets busy consistently shortly before 7am UTC time (11pm PST) on Sunday through Thursday, and it stays busy for roughly 7 hours. The regularity has to come from the same instance, and given that the chance of landing a new instance on the same physical host is fairly low, you can be sure that the instance was on the whole time, even during the time it is not using the CPU. Our own experience with Steptacular — the production web application — also confirms that. We do not turn it off during off peak because there is so much state stored on the instance that it is big hassle to shut it down and turn it back on.


CPU utilization on one of the measured server


Compared to other cloud providers, Amazon does enjoy an advantage of having many customers; thus, it is in the best position to have a higher CPU utilization. The following figure shows the busiest physical host that we profiled. A couple of instances on this physical host are probably running a batch job, and they are very CPU hungry. On Monday, two or three of these instances get busy at the same time. As a result, the CPU utilization jumped really high. However, the overlapping period is only few hours during the week, and the average utilization come out to be only 16.9%. It is worth noting that this busiest host that we measured still has a lower CPU utilization than the average CPU utilization we observed in an internal data center.

CPU utilization of a busy EC2 server
You may walk away from this disappointed to know that public cloud does not have an efficiency advance. But, I think from a research stand point, this is actually a great news. It points out that there is a significant room to improve, and research in this direction can lead to a big impact on cloud provider’s bottom line.

Launch a new site in 3.5 weeks with Amazon

Getting started quick is one of the reasons that people adopted cloud, and that is why Amazon Web Services (AWS) is so popular. But people often overlook the fact that the retail part of Amazon is also amazing. If your project involves supply chain, you can also leverage Amazon retail to get up and running quickly.

We recently launched a wellness pilot project at Accenture where we leveraged both Amazon retail and Amazon web services. The Steptacular pilot is designed to encourage Accenture US employees to lead a healthy lifestyle. We all had our new year resolutions, but we always procrastinate, and we never exercise as much as we should. Why? Because there is a lack of motivation and engagement. The Steptacular pilot uses a pedometer to track a participant’s physical activity, then it leverages concepts in Gamification, uses social incentive (peer pressure) and monetary incentive to constantly engage participants. I will talk about the pilot and its results in details in a future post, but in this post, let me share how we are able to launch within 3.5 weeks, the key capabilities we leveraged from Amazon and some lessons we learned from this experience.

Supply chain side

The Steptacular pilot requires participants to carry a pedometer to track their physical activity. This is the first step of increasing engagement — using technology to alleviate the hassle of manual (and inaccurate) entry. We quickly locked into the Omron HJ-720 model because it is low cost and it has a USB connector so that we can automate the step upload process.

We got in touch with Omron. The guys at Omron are super nice. Once they learned what we are trying to do, they immediately approved us as a reseller. That means we can buy pedometer at the wholesale price. Unfortunately, we still have to figure out how we can get the devices into our participants’ hands. Accenture is a distributed organization with 42 offices in the US alone. To make the matter worse, many consultants work from client sites, so it is not feasible to distribute in person. We seriously considered three options:

  1. Ask our participants to order directly from Amazon. This is the solution we chose in the end, after connecting with the Amazon buyer in charge of the Omron pedometer and being assured that they will have no problem handling the volume. It turns out that this not only saves us a significant amount of shipping hassle, but it is also very cost effective for our participants.
  2. Be a vendor ourselves and uses Amazon for supply chain. Although I did not know about it before, I am pleasantly surprised to learn about the Fulfillment by Amazon capability. This is Amazon’s cloud for supply chain. Like a cloud, this is provided as a service — you store your merchandise in Amazon’s warehouse, and they handle the inventory and shipping. Also, like a cloud, it is pay per use with no long term commitment. Although equally good at reducing hassle for us, we did not find that we can save cost. Amazon retail is so efficient and has such a small margin that we realize we cannot compete even though we are happy with a 0% margin and even though we (supposedly) pay for the same wholesale price.
  3. Ship and manage by ourselves. The only way we could be cheaper is if we manage the supply chain and shipping logistics ourselves, and of course, this is assuming that we work for free. However, the amount of work is huge, and none of us wants to lick envelope for a few weeks, definitely not for free.

The pilot officially launched on Mar. 29th. Besides Amazon itself, another Amazon affiliate, J&R music, also sells the same pedometer on Amazon’s website. Within a few minutes, our participants were able to totally drain J&R’s stock. However, Amazon remained in stock for the whole duration. Within a week, they sold roughly 3,000 pedometers pedometers. I am sure J&R is still mystified by the sudden surge in demand. If you are from J&R, my apologies for not giving adequate warning ahead and kudos to you for not overcommitting your stock like many TouchPad vendors did recently (I am one of those burned by OnSale).

In addition to managing device distribution, we also have to worry about how to subsidize our participants. Our sponsors agreed to subsidize each pedometer by $10 to ease the adoption, but we could not just write each participant a $10 check — that is too much work. Again, Amazon came to the rescue. There are two options. One is that Amazon could generate a bunch of one-time-use $10 discount code which is specifically tied to the pedometer product, then, based on how many are redeemed, Amazon could bill us for the total cost. The other option is that we could buy a bunch of $10 gift cards in bulk and distribute to our participants electronically. We ultimately chose the gift card option for its flexibility and also for the fact that it is not considered a discount so that the device would still cost more than $25 for our participants to qualify for super saver shipping. Looking back, I do regret choosing the gift card option, because managing squatters turns out to be a big hassle, but that is not Amazon’s fault, it is just human nature.

Technology platform side

It is a no-brainer to use Amazon to leverage its scaling capabilities, especially for a short-term quick project like ours. One key thing we learned from this experience is that you should only use what you need. Amazon web services offer a wide range of services, all designed for scale, so it is likely that you will find a service that serves your need.

Take for example the email service Amazon provides. Initially, we used Gmail for sending out signup confirmations and email notifications. During the initial scaling trial, we soon hit Gmail’s limit on how fast we can send emails. Once realizing the problem, we quickly switched to Amazon SES (Simple Email Service). There is an initial cap on how many we can send, but it only took a couple of emails for us to lift the limit. With a couple of hours of coding and testing, we all of a sudden can send thousands of emails at once.

In addition to SES, we also leveraged AWS’ CloudWatch service to enable us to closely monitor and be alerted of system failures. Best of all, it all comes for free without any development effort from our side.

Even though Amazon web services offer a large array of services, you should only choose what you absolutely need. In other words, do not over engineer. Let us taking auto scaling as an example. If you host a website in Amazon, it is natural to think about putting in an auto-scaling solution, just in case to handle the unexpected. Amazon has its auto scaling solution, and we, at the Accenture labs, have even developed an auto-scaling solution called WebScalar in the past. If you are Netflix, it makes absolute sense to do so because your traffic is huge and it fluctuates widely. But if you are smaller, you may not need to scale beyond a single instance. If you do not need it, it is extra complexity that you do not want to deal with especially when you want to launch quick. We estimated that we will have around 4,000 participants, and when we did a quick profiling, we figured that a standard extra-large instance in Amazon would be adequate to handle the load. Sure enough, even though the website experienced a slow down for a short period of time during launch, it remains adequate to handle the traffic for the whole duration of the pilot.

We also learned a lesson on fault tolerance — really think through your backup solution. Steptacular survived two large-scale failures in the US East data center. We enjoyed peace of mind partly because we are lucky, partly because we have a plan. Steptacular uses an instance-store instance (instead of an EBS instance). We made the choice mainly for performance reasons — we want to free up the network bandwidth and leverage the local hard disk bandwidth. This turns out to have saved us from the first failure in Apr. which is caused by EBS blocks failure. Even though we cannot count on EBS for persistency, we build in our own solution. Most static content on the instance is bundled into a Amazon Machine Image (AMI). There are two pieces of less static content (the content that changes often) stored on the instance: the website logic and the steps database. The website logic is stored in a Subversion repository and the database is synced to another database running outside of the US East data center. This architecture allows us to be back up and running quickly, by first launching our AMI, then check out website code from repository and lastly dump and reload the database from the mirror. Even though we did not have to initiate this backup procedure, it is good to have the peace of mind knowing your data is safe.

Thanks to Amazon, both Amazon retail and Amazon web services, we are able to pull off the pilot in 3.5 weeks. More importantly, the pilot itself has collected some interesting results on how we can motivate people to exercise more. But I will leave that to a future post after we have a chance to dig deep into the data.

Acknowledgments

Launching Steptacular in 3.5 weeks would not have been possible without the help of many people. We would like to especially thank the following folks:

  • Jim Li from Omron for providing both hardware, software and logistics support
  • Jeff Barr from Amazon for connecting us with the right folks at Amazon retail
  • James Hamilton from Amazon for increasing our email limit on the spot
  • Charles Allen from Amazon for getting us the gift codes quickly
  • Tiffany Morley and Helen Shen from Amazon for managing the inventory so that the pedometer miraculously stayed in stock despite the huge demand

Last but not least, big kudos to the Steptacular team, which includes several Stanford students, who worked really hard even through the finals week to get the pilot up and running. They are one of the best team I proudly have ever worked with.